
Most whole house renovations start the same way. You are standing in a cramped kitchen, or a dark back room nobody uses, thinking: I want to renovate my house- where do I start?
The order you do things in matters more than any single design decision. Get the sequence right and the project moves. Get it wrong, and you pay twice for the same wall.
What follows is the planning process we use on full-home projects in the west end of Toronto, from the first list of goals through to handover and warranty. It is written for homeowners planning major work on a house they intend to keep.
What a Whole House Renovation Actually Includes
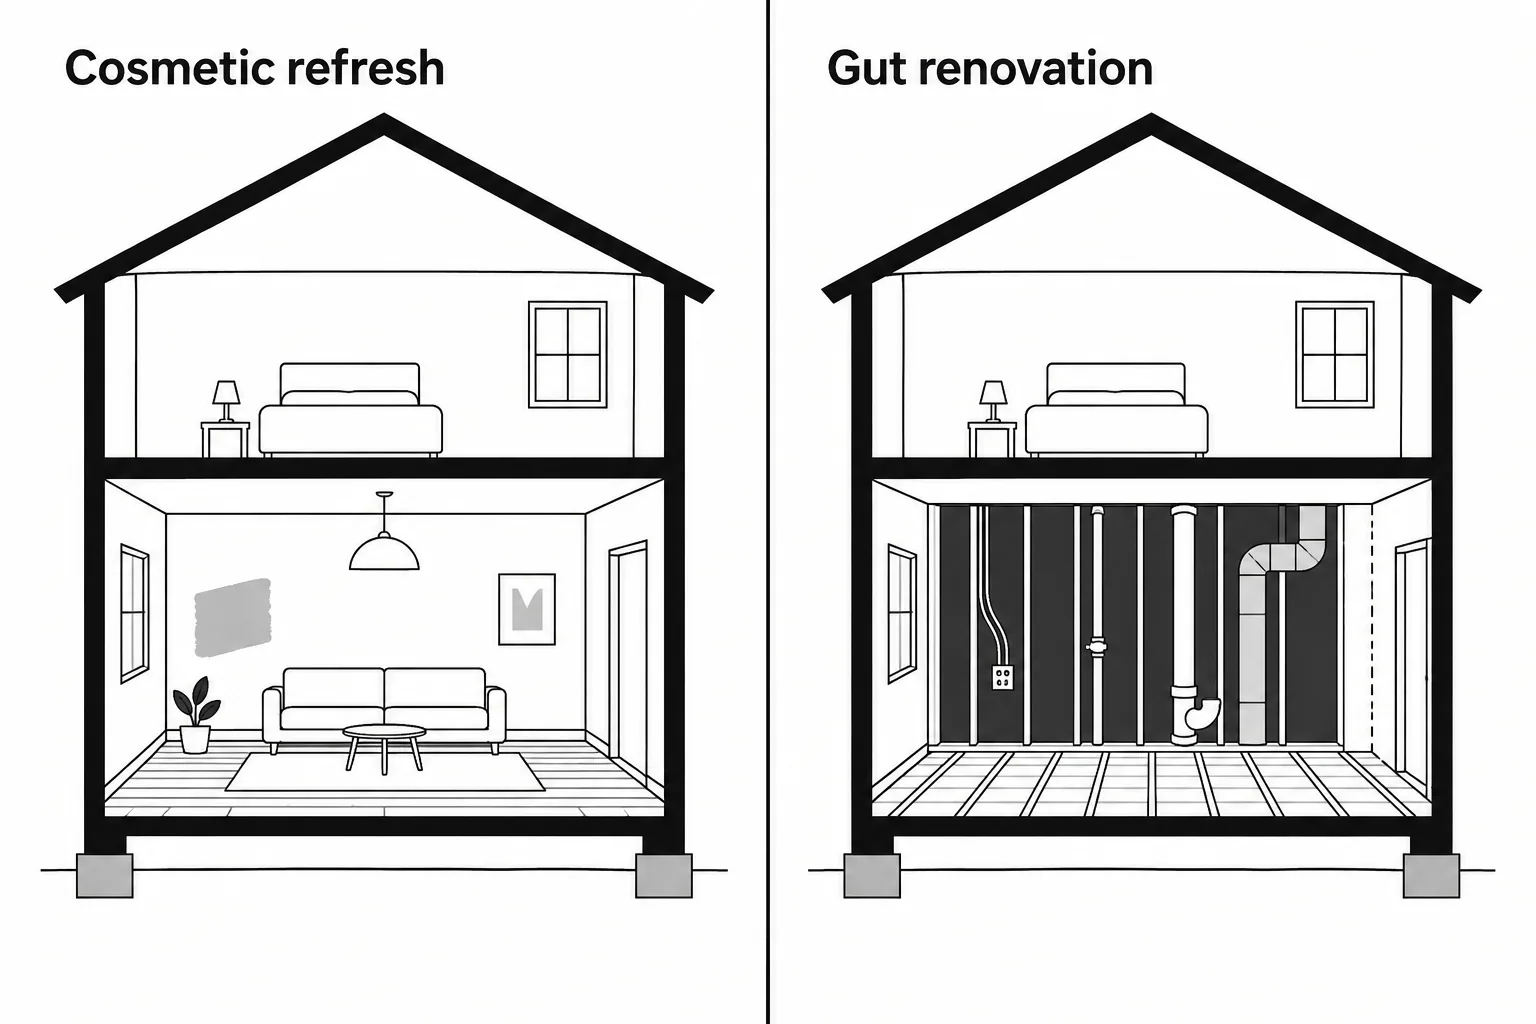
A whole house renovation touches most or all of the rooms at once, usually along with the systems behind the walls. That is different from a cosmetic refresh, where you paint, replace floors, swap fixtures, and leave everything else where it sits.
The two ends of the range:
| Approach | What happens |
|---|---|
| Cosmetic refresh | Finishes change. Walls, wiring, plumbing and heating stay as they are. |
| Gut renovation | Walls come open, layouts change, and the wiring, plumbing, heating, and cooling are replaced or upgraded as part of the job. |
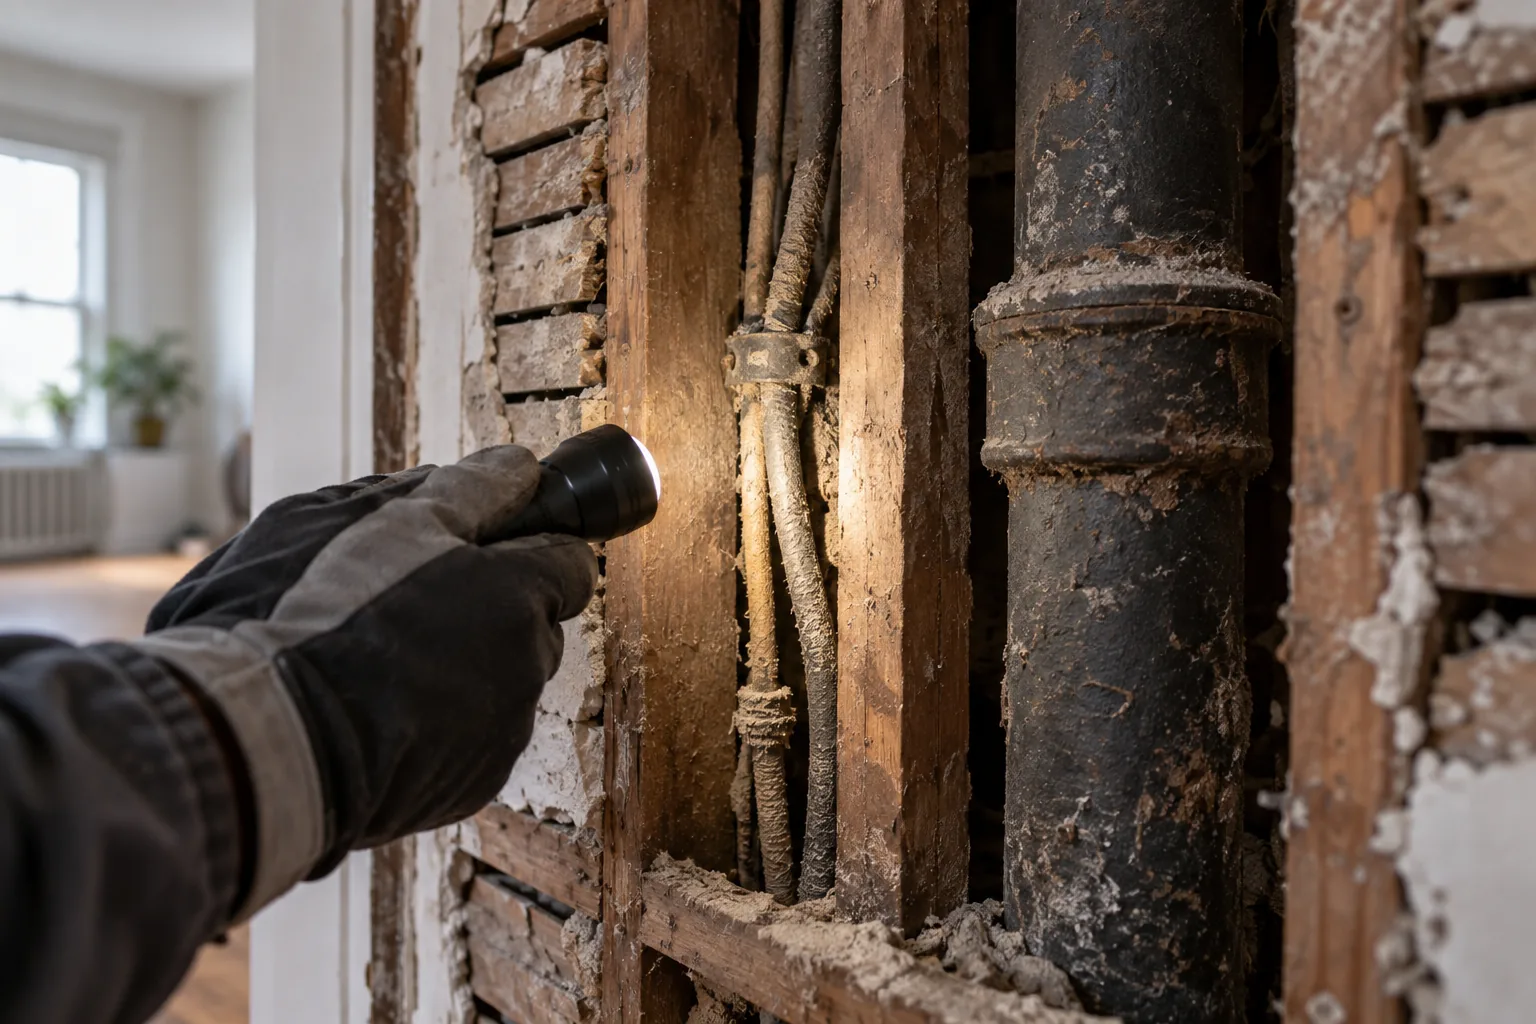
Many projects fall between a cosmetic refresh and a gut renovation. Age can raise questions about a house’s structure and systems, but an assessment, not age alone, shows what work is needed. In older West Toronto homes, examples that may need checking include wiring, supply lines, drains, electrical capacity, basement headroom, and water entry. The condition varies from house to house.
A family that needs another bedroom may be considering a ground-level or second-storey addition. A family looking for more usable basement space may need finishing work or, if headroom is limited, an underpinning assessment. These choices affect the layout, structure and approvals, so raise them during planning. Ashford’s home addition service and basement underpinning service explain those options.
For Ashford, kitchen and bathroom work is part of a larger renovation rather than a standalone project. You may be looking at a whole-house project rather than a one-room job if several rooms or systems need attention, the layout does not work across floors, or the work you want in one area affects another. If you are weighing a single room against a larger scope, our overview of full home renovation projects explains how we approach the work.
Step 1: Define Your Goals and Scope
Before budgets, before contractors, before a single saved photo, write down how you actually live in the house and what fails you daily. Not “the kitchen is dated.” More like: three people jam up at the front door every morning, there is nowhere to set groceries down, the only full bathroom is upstairs, the back of the house is dark by four o’clock.
Then split the list in two.
Must fix. Roof, foundation, water getting in, drainage, unsafe or overloaded electrical, failing plumbing, heating that cannot keep up. Not negotiable, and they eat budget without showing up in a single photograph.
Want to have. Island, ensuite, mudroom, larger windows, a proper laundry room, an open main floor.
Next, decide your horizon. If you may move in a few years, prioritize necessary repairs and consider how the proposed work fits your plans; no renovation guarantees a particular resale return. If you expect to stay longer, comfort, maintenance, and energy use may carry more weight in your decisions.
Staying five years and staying twenty-five years lead to different projects. A short horizon argues for fixing what is broken and doing the work a future buyer will pay for. A long horizon justifies the expensive, invisible work: better insulation, proper ventilation, a service upgrade, drainage done right.
Gather your inspiration in one place. A shared folder, a saved collection, screenshots- it does not matter which. A set of reference images can help a design team understand the look and functions you prefer.
Then document what you have: room dimensions, ceiling heights, window positions, and where the panel, the furnace, and the main stack live. Rank the whole list, best to worst. The budget conversation is coming, and it will force trade-offs. It goes better when you already know what you would give up first.
Step 2: Set a Real Budget and a Project-Specific Contingency
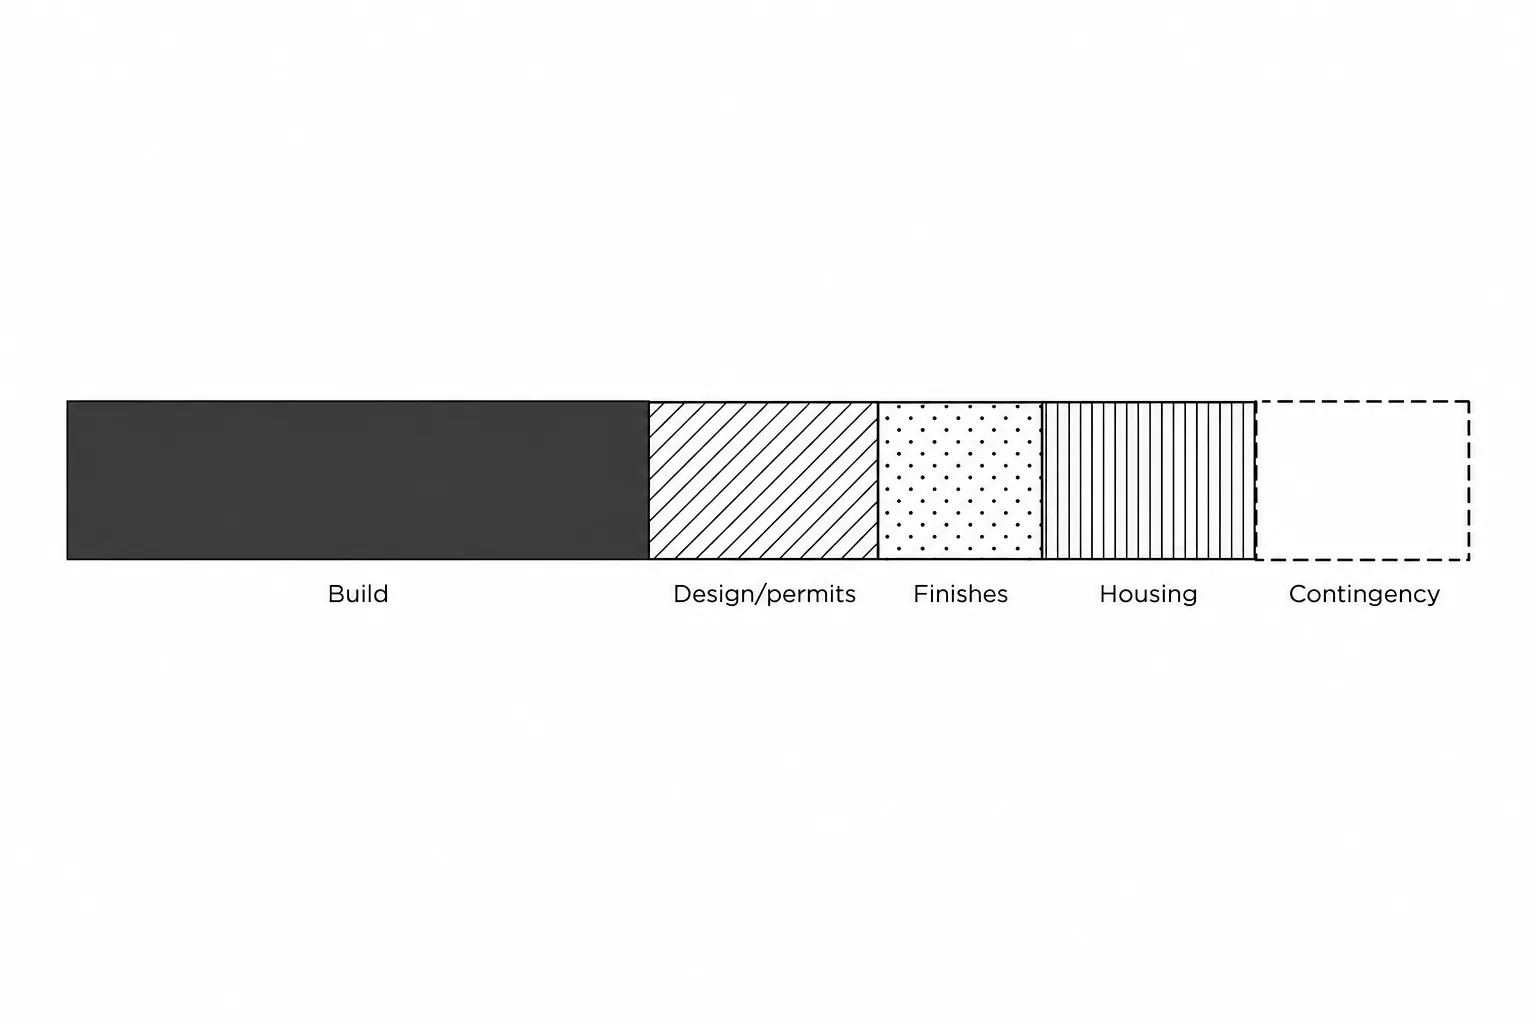
A renovation budget is not just the construction number. It is construction, plus design and permits, plus finishes and fixtures, plus somewhere to live and somewhere to store your furniture if you move out, plus contingency.
Set a contingency after the project scope and the house’s condition have been assessed. The right amount depends on what is known, what remains inaccessible, and how much structural work is involved. Ask your contractor to show what is included, what is an allowance, what is excluded, and how newly discovered conditions will be priced. There is no single percentage that fits every house.
Online rules of thumb, including the “30% rule,” cannot tell you whether a specific renovation is sensible. Base the budget on the proposed work, the condition of the house, the costs outside construction, and your own plans for the property.
A single headline budget, such as $100,000, does not show what a particular house can reasonably receive. The answer depends on the size and condition of the home, the work included, and the finishes. Get a scoped estimate for the actual property rather than treating a general figure as a quote.
When comparing proposals, look line by line at the scope, allowances, exclusions, design and permit costs, disposal, taxes, and temporary living costs. A lower total may reflect a different scope, so ask what explains the difference before choosing. Allowances are placeholder amounts for items you have not selected yet, such as tile, cabinets, or lighting. Confirm the allowance amount and how any difference will be handled.
Know your ceiling before design starts. A design drawn to the wrong number has to be taken apart later, and the parts that get removed are almost always the ones you liked most.
Step 3: Get the House Assessed Before You Design
Assessing the house before the design is finalized helps the team avoid making important decisions on assumptions alone.
Before a wall is marked for removal, somebody needs to understand how the house carries its load: where the weight comes down, what is holding the floor above, what happens at the footings if that wall disappears. Removing a wall is usually possible. What varies is what has to be added to replace it, and that answer belongs in the price before you fall in love with the drawing.
At the same time, look hard at the systems: the age and capacity of the electrical service, the condition of the plumbing stack and drains, the state of the heating and cooling, and whether the basement stays dry in a heavy rain.
Basement height and water conditions belong in this conversation too. If you want a family room downstairs, first confirm that the existing space can support the intended use. If you want a separate suite, review the zoning, building, and fire-safety requirements early. Where the ceiling is too low, ask whether underpinning is feasible.
For layout changes, Ashford’s interior redesign service includes a structural review before wall removal, with electrical and mechanical planning considered alongside the new layout.
Record What You Know and What Still Needs Checking
Before design is fixed, gather any existing plans, property survey, permit records and inspection documents you have. Note visible water issues, cracks, previous alterations, and system concerns. If the proposed work may disturb older materials, ask an appropriate professional whether testing is needed before demolition. This list will not reveal every concealed condition, but it helps the team identify what needs further review.
Step 4: Choose How You Buy the Project
There are two common ways to buy a renovation.
Separate designer and builder. You hire a designer, get drawings, then send those drawings out to contractors for pricing. It works, but you stand in the gap. If the price comes back over budget, the redesign is on you. If the drawings and the built reality disagree, both parties will have a reasonable explanation, and you will be the one deciding between them.
Design-build. One team carries the design, the permits, and the construction. The team can review cost and construction questions as the design develops, with one point of contact coordinating the work.
Either route, ask every firm the same questions. Who is responsible for the drawings, and what qualifications apply to this work? What liability insurance and WSIB coverage apply to the people on site? What does the warranty cover, and for how long? How many projects are they running right now? Can they provide references from projects with a similar scope?
Toronto explains that a property owner may prepare permit drawings if they have the required drafting skills and Ontario Building Code knowledge. Otherwise, a qualified designer with a BCIN or a professional such as an architect or engineer may be needed, depending on the work. See the City’s permit-drawing guidance. Ashford is BCIN licensed and handles design and permit applications in-house.
Before signing, resolve any gaps in the written scope, payment schedule, permit responsibility, change-order process, project dates, and insurance documentation. If a quote or promise is vague, ask for the details in writing.
Ashford brings design, permits, and construction together, with a five-year warranty. Our renovation process explains the steps from consultation through handover. For contract details, see our guide to what to look for in a home renovation contract.
Step 5: Permits, Zoning, and the Toronto Timeline
Permits are not paperwork you handle later. They set your calendar.
In Toronto, a building permit is required to make structural or material alterations, such as adding or removing walls. That covers a large share of what a whole-house renovation involves. Additions, underpinning, changes to heating or plumbing systems, and a change from one dwelling unit to multiple units can also require a permit or other approvals. Confirm what applies to the exact scope.
Keep two ideas separate. Zoning governs what you are allowed to build: how big, how tall, how close to the property line, how much of the lot you can cover. The building permit governs how you build it: the structural, safety, and code side. A design can be perfectly buildable and still not be permitted if it exceeds what the zoning allows on your lot. The City’s Zoning By-law 569-2013 guide explains how to check the standards and site-specific rules that may apply.
When a plan does exceed those limits, the route is an application to the Committee of Adjustment for a minor variance. Whether a variance is needed depends on the property and proposed design; if it is, allow time for the separate application and review process.
Other Approvals and Property Conditions to Check
Check early for heritage status, easements, ravine or conservation restrictions, trees, and shared-driveway conditions. Electrical work may also need a separate permit or notification: a building permit does not cover electrical work. The Electrical Safety Authority’s homeowner guidance explains the separate process and when a licensed electrical contractor is required.
The practical consequence is timing. Design, drawings, and approvals take a real chunk of the year before anyone picks up a hammer. A February conversation could lead to a summer start, depending on the scope, design decisions and approvals. If you have a target season, begin planning well ahead of it.
Do not start work that requires a permit until it has been issued. The City warns that missing permits can lead to delays, legal action, or removal of completed work.
Step 6: Lock the Schedule and Decide Where You Will Live
A whole-house renovation is a different animal from a single room. More trades, more inspections, and more dependencies where one late item stalls three others.
The biggest lifestyle decision is whether you stay. Staying can avoid rent and storage costs, but it can make day-to-day life harder and may affect how the work is scheduled. You need dust control, a temporary kitchen, at least one working bathroom, and an agreement about noise hours. Pets and small children make it harder again. Moving out adds rent and storage costs, but it can give the crew more access to the house. It does not guarantee a shorter project; the right plan depends on the work, safety, and schedule.
Either way, order the long-lead items before demolition starts. Windows, cabinets, tile, and appliances are the usual culprits. Confirm lead times with suppliers and coordinate orders with final measurements and selections; a delay to one item can affect the work that depends on it.
Build schedule float around deliveries, required inspections, and any corrections. Ask the project team how inspections will be requested and what work must remain visible beforehand.
Planning in Phases Versus Renovating at Once
A whole-house plan is useful even if the construction must happen in stages. Group work around shared systems and dependencies, and identify which completed areas might need to be reopened if a later phase changes the plumbing, electrical, structure, or layout.
Renovating several connected areas in one project may reduce repeated setup and help avoid disturbing finished work. Phasing can make the project more manageable for the household or budget, but it may involve repeat setup or extra coordination. There is no single option that is less expensive for every home. Decide with the full scope and likely sequence in view.
Step 7: Follow a Typical Whole-House Renovation Sequence
The exact order depends on the design, permit, and site conditions. A common high-level sequence is:
- Site protection, disconnects, and demolition. Protect what stays, arrange safe service disconnections, then remove what the approved plans say goes.
- Structural and foundation work. Footings, beams, framing repairs, subfloors, and basement lowering if these are part of the scope. Required inspections may occur at specific points within this stage, including before work is covered or concrete is placed.
- Exterior envelope. Roof, windows, doors, cladding, waterproofing, and drainage. Where the project allows, get the home protected from weather before proceeding with interior finishes.
- Rough-ins. Plumbing, electrical, heating and cooling, plus data and low-voltage wiring, all run while the walls are open.
- Required inspections and reviews. Inspections take place at the stages specified for the project. Work that must be inspected needs to remain visible until it has passed. The City’s house inspection schedule lists common inspection stages and requirements.
- Close-in. Insulation, vapour barrier, drywall, taping and priming, once the required work has been inspected.
- Finishes. Flooring, trim, cabinets, countertops, tile and paint follow a project-specific sequence. Coordinate the order with the materials and trades so completed surfaces are protected.
- Fixtures and trim-out. Appliances, plumbing fixtures, light fixtures, switches, and hardware.
- Final inspection, deficiency list, cleanup and handover. Walk the house, list remaining items, complete them, and collect the handover and warranty documentation.
The costly mistake is covering work before a required inspection. The City says elements covered before they pass inspection may need to be uncovered so they can be checked.
Step 8: Make Decisions Early and In Writing
Every renovation runs on a selections schedule: the list of what has to be chosen by when. Rough locations for plumbing fixtures are needed before framing closes. Tile layouts and lighting positions are needed before drywall. Hardware and paint colours come later, but not much later than people assume.
Changes are normal. Undocumented changes are not. A change should be priced and approved in writing before the work proceeds, so the number never arrives as a surprise on an invoice. Being fair about scope changes rather than surprising people with charges is part of how we work.
Keep the project out of a text thread. Our clients track schedule, budget, approvals, and messages through project software (JobTread), which means the decision you made in April is still findable in September.
Agree on who will approve selections and scope changes, and how decisions will be recorded. That helps the team keep work moving when a choice affects the schedule.
The Biggest Whole House Renovation Mistakes
- Designing without a budget. You end up value-engineering, and the first things cut are usually the things that made the design good.
- No contingency. The first hidden condition becomes a crisis instead of a line item.
- Choosing on price alone. Quotes with different scopes, allowances, and exclusions are not directly comparable.
- Changing your mind after drywall. The same decision costs a fraction on paper compared to what it costs once walls are closed.
- Skipping permits. It can surface at resale, during an insurance claim, or when you apply for future work.
- Ignoring the boring systems. Drainage, insulation, and ventilation are invisible, and they are what make a renovated house feel good to live in.
- Planning one room at a time without a whole-house view. A phased project can work, but plan how each stage connects to later work to avoid reopening finished areas.
- Not planning for what you already know is coming. If an addition or a basement suite is in your future, the drawings should account for it now, even if the build is years out.
A Simple Whole House Renovation Checklist
Here is the whole thing, condensed to a step-by-step home renovation checklist you can work through in order:
- Write the goals list: daily frustrations, must-fix items, want-to-have items, ranked.
- Decide your horizon: how long you plan to stay.
- Assess the house: structure, electrical, plumbing, drains, heating and cooling, basement height, water.
- Set the full budget: construction, design and permits, finishes, living costs, and a contingency based on the project’s scope and unknowns.
- Choose your team, and check who is responsible for design, permits, construction, insurance, warranty, and references.
- Design to the budget, and price the design as it develops.
- Confirm zoning, apply for permits, and allow time for a variance if the plan needs one.
- Decide where you will live, and book storage or a rental if you are moving out.
- Lock the selections schedule and order long-lead items before demolition.
- Build in the sequence approved for the project, and schedule required inspections before covering work.
- Walk the deficiency list, take handover, and file your warranty paperwork.
Bringing a project to a first consultation? Bring photos of the house, your ranked wish list, your budget range, your ideal timing, and any existing drawings or a survey if you have them. That is enough for a productive first conversation.
Frequently asked questions
What is the difference between a whole-house renovation and a one-room renovation?
Do I need a permit to renovate my house in Toronto?
How long does a whole-house renovation take in West Toronto?
Can I stay in my home during a whole-house renovation?
How much contingency should I set aside?
Should I renovate all at once or in phases?
Planning a Whole House Renovation in West Toronto
Twenty-five years and more than 100 homes in the west end means we know the housing stock here, what tends to be hiding behind the plaster, and how the zoning and permit process actually plays out in this city. We live in the same neighbourhoods we build in, so if something is not right, we are down the road.
Related readingHow to Choose a Renovation Contractor in TorontoRead the guide →One team carries the whole job: design, permits, and construction, with a clear price and timeline agreed before the build starts, and a 5-year warranty behind the work.
If you are considering a major renovation for next season, start the conversation early, so there is time to scope the work, develop the design, and address approvals. Book a free consultation and bring your list; we will talk through what your home may need.
